Ever noticed how your backyard can turn into a playful obstacle course for your pup? Imagine setting up a mini agility course that builds your dog’s confidence and gives you both a daily burst of energy.
You can create fun jumps with PVC pipes and even reuse old play tunnels. Even a small space hides room for big adventures.
Our easy tips help you design a safe course that’s both budget-friendly and exciting. Picture your furry friend zooming through the course with a happy bark in the fresh morning air.
Why not give it a try? Turn your backyard into the new favorite hangout spot where playful pups can explore and enjoy.
Key DIY Agility Course Ideas for Your Backyard
Creating a fun agility course in your backyard can be a blast and easy on your wallet. You can use budget-friendly DIY tips like affordable PVC piping, which usually costs about $2–3 for a 10-foot piece, along with wood planks for around $5 each. These items let you put together different obstacles without any hassle.
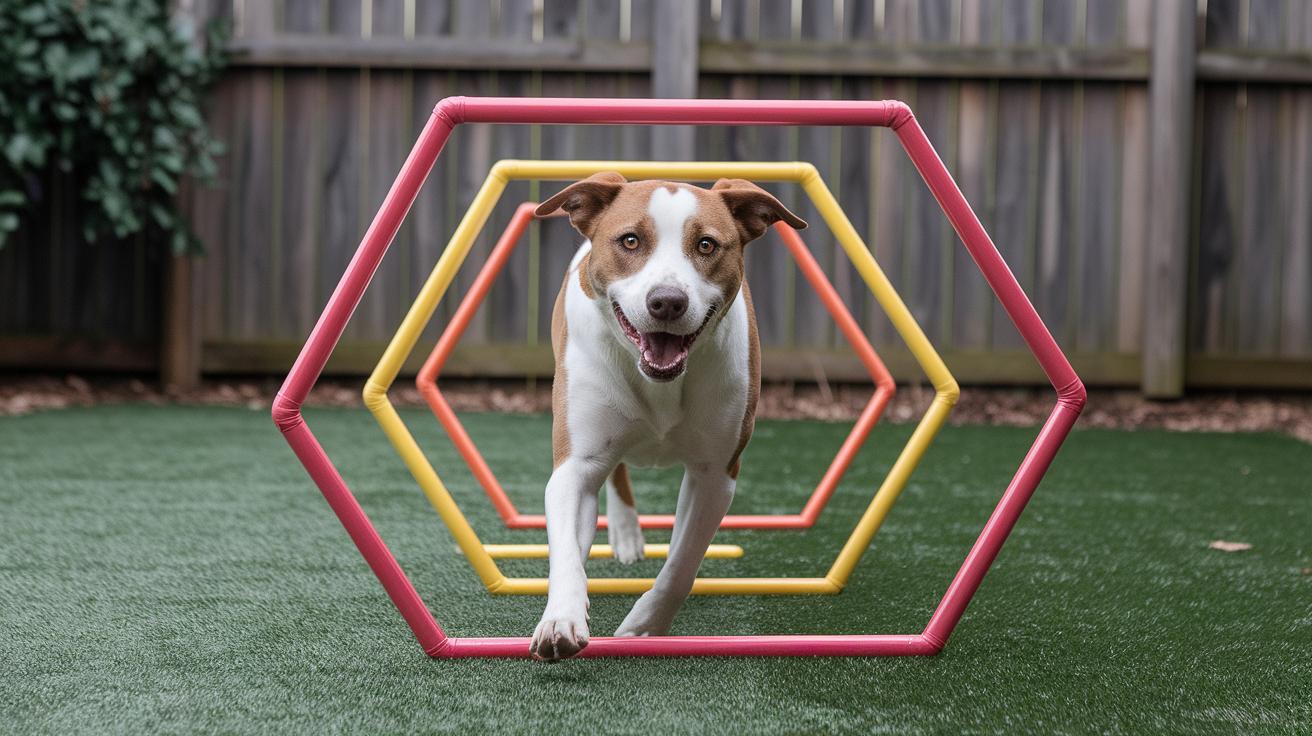
One great challenge to try is an adjustable jump. You can set the jump anywhere between 6 inches and 24 inches so your dog can gradually improve. Picture it like this: before building the jump, a pup named Buddy learned to conquer a tiny hurdle that almost let him bask in the sunlight. It’s a fun way to boost your furry friend’s confidence with each new jump.
Next, think about adding a tunnel. You can repurpose a kids’ play tunnel that costs around $10. This gives your dog a playful pathway, like exploring a hidden cave, where they can zoom through with joy. Another cool idea is to set up weave poles; positioning them 26 inches apart gives your dog just the right space to twist and turn.
For a simple balance challenge, try a low balance beam made from 2×4 boards set on cinder blocks. It’s like a mini tightrope, helping your pet improve balance and focus in a safe yet exciting way.
Quick DIY ideas:
- Adjustable jumps using PVC piping
- A kids’ play tunnel repurposed for fun
- Weave poles spaced 26 inches apart
- Low balance beam made from 2×4 boards on cinder blocks
These tips make it simple to build a backyard agility course that’s both engaging and budget-friendly, giving your pup a chance to enjoy every playful leap.
Planning Your Backyard Dog Agility Course Layout
Start by taking a good look at your yard. If your space is small, like about 20 by 20 feet, set up six obstacles. Picture your cheerful dog weaving around just like a nimble terrier on a playful day.
For a medium yard, around 30 by 30 feet, try arranging ten fun challenges. This size lets you mix it up, a jump here, a tunnel there, giving your pup plenty of space to run and play.
If you've got a larger spot, say 40 by 40 feet or more, you can easily create a course with 12 or more obstacles. This gives your furry friend a chance to test speed and precision, like dashing from one challenge to the next with boundless energy.
Keep about 8 to 10 feet of space between each obstacle so your dog can move smoothly from one to the next. For example, place jumps on level ground to keep things safe, and set tunnels on softer grass to give extra cushion during fast dashes.
Taking a little extra care with where you put each obstacle can make the course flow nicely, keeping things fun and balanced for your pet.
Essential DIY Backyard Dog Agility Obstacles and Construction
Let’s kick things off with jumps. You can make adjustable hurdles using 1-inch PVC uprights and crossbars with slip-in connectors. They cost about $15 each and let you change the height by sliding the crossbar up or down. Imagine your pup starting with an easy jump and then trying a higher one as his confidence grows.
Next, try turning a 10-foot pop-up kids’ tunnel into a playful passage. All you have to do is cover the tunnel with a chalkboard tarp, secure it with anchors, and presto, your dog will have a bright, safe tunnel to dash through. Picture your furry friend zooming along a tunnel that feels like a mini race track, with lots of space to explore.
Then, set up weave poles by placing six stakes or even broom handles in a straight line with about 26 inches between each. Adding bright tape to the poles makes them stand out for your pup, creating a fun challenge that feels just like a mini obstacle race.
Finally, build an A-frame ramp using two 4×8-foot plywood panels. Hinge them together at the top so they form a 45-degree angle, then apply a non-slip finish to keep your dog safe. Think of it as a mini roller coaster that helps improve your dog’s balance and coordination.
Quick construction tips:
- Jumps: Use PVC and slip-in connectors for adjustable hurdles.
- Tunnels: Upgrade a pop-up tunnel with a chalkboard tarp and secure anchors.
- Weave poles: Arrange six stakes about 26 inches apart with bright tape for visibility.
- A-frame ramps: Hinge plywood panels for a 45-degree ramp and cover with a non-slip finish.
Safety Guidelines and Material Selection for Backyard Dog Agility

When setting up an agility course for your dog, the right materials make all the difference. Pick supplies that last long, are safe for your pet, and don’t break the bank. Always smooth out any rough edges on wood and cover them so you won’t have to worry about splinters. Using strong, non-toxic materials helps keep your furry friend safe as they zip from one fun obstacle to the next.
For instance, many pet owners opt for PVC piping because it’s light, easy to work with, and you can smooth the edges and add end caps to protect your pup’s paws. And when you build tunnels, be sure to secure the pop-up design with stakes so that it stays put, no unexpected collapses while your pet is having fun.
After playtime, it’s smart to use pet-friendly cleaning products to wipe down the obstacles, keeping dirt and germs away. Regularly checking the condition of your materials and replacing any worn-out pieces goes a long way in maintaining a safe play area for your dog.
| Material | Cost per unit | Safety Tip |
|---|---|---|
| PVC pipe (1″) | $3/10 ft | Sand edges, use end caps |
| 2×4 lumber | $5 each | Seal to prevent splinters |
| Pop-up tunnel | $10 | Anchor ends with stakes |
| Flexible PVC poles | $4 each | Use PVC to avoid breakage |
Taking the time to choose the right materials with these safety tips makes your backyard course not only fun but also a secure playground for your best furry friend.
backyard dog agility course ideas: Energize Your Pup
When you’re just starting out, try a simple setup with low hurdles around 6 inches tall and a straight tunnel. This helps your dog build up confidence without feeling overwhelmed. Picture your pup happily dashing through a tunnel, tail wagging as if on a mini adventure. Use affordable items around your home to create a course that’s fun and easy to follow.
Next, add a little twist with some intermediate challenges. You can set up weave poles, about 6 to 8 of them, and angled jumps that mix up the route. A couple of small pause tables give your dog a brief break, letting them refocus before moving on. Rotate the obstacles every week and watch your furry friend discover new tricks and hidden bits of joy in your yard.
For more advanced agility, try joining forces with tougher challenges. Think about including a seesaw made from an 8-foot plank, with a pivot placed one-third of the way along, plus an A-frame built from 6 by 6-foot panels. You might also create a winding, serpentine path that encourages your dog to weave through the obstacles in creative ways. These additions keep experienced pups engaged and continuously boost their agility skills.
Visual Examples and Design Inspiration for Backyard Dog Agility Courses

Have you ever drawn your own pet agility course on graph paper, almost like planning a mini adventure for your furry friend? One fun idea is to build a straight course with eight obstacles in a 20×40 ft space. This layout includes a straight tunnel, a few jumps, and a smooth weave sequence that takes your dog on a little journey. Fun fact: many top agility courses began as simple, straight paths where each obstacle built more excitement for the next.
Then, think about a circular circuit that fits perfectly into a 30×30 ft area. In this plan, the obstacles switch between jumps and contact challenges, making a playful loop that keeps your dog excited from all sides.
Lastly, consider a modular quadrant design by splitting a 40×40 ft yard into four equal 20×20 ft sections, each with its own unique theme. Maybe one quadrant feels like a garden, while another offers a tougher, outdoor challenge.
Try sketching these plans or using some templates to get started. Let your dog's lively energy inspire you to create a course as one-of-a-kind as they are.
Final Words
In the action, you've discovered creative backyard dog agility course ideas that combine fun design with budget-friendly tips. You learned how to plan your layout for any yard size, build safe obstacles, and even vary challenges as your dog’s skills improve.
This hands-on guide sparks easy wins in crafting a pet-friendly agility course that transforms your backyard into a playful gym. Embrace these ideas to boost your pet's health and happiness, one delightful step at a time.
FAQ
How do I plan my backyard dog agility course layout?
The backyard course layout means planning obstacles based on your yard’s size. Small yards suit 6 obstacles, medium fit 10, and large spaces can hold 12+ with 8-10 ft between elements for safe flow.
What materials should I use to build DIY backyard dog agility obstacles?
The DIY course uses materials like affordable PVC piping, wood planks, and pop-up tunnels. These items are cost-friendly and simple to assemble, making your backyard agility setup both durable and safe.
How do I build common obstacles for my backyard agility course?
Building obstacles involves using PVC for adjustable jumps, retrofitting pop-up tunnels for safe runs, setting up evenly spaced weave poles, and creating A-frame ramps with hinged panels for a secure challenge.
How can I customize course difficulty and add variety for progressive challenges?
Customizing your course means starting with easy setups like low hurdles and straight tunnels, then gradually adding angled jumps, extra poles, and even seesaws to keep your pet mentally and physically engaged.
What safety guidelines should I follow when constructing a backyard agility course?
Safety means choosing non-toxic, durable materials, sanding PVC edges, sealing wood to prevent splinters, and securely anchoring obstacles like tunnels to create a safe, fun environment for your pet.